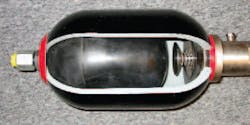
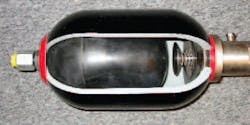
Accumulators have proven to be extremely reliable in many fluid power applications, when selected, installed, and operated properly. While installation may seem a very simple process, it is perhaps the most misunderstood procedure in the life of an accumulator. Unfortunately, many users do not follow all the proper accumulator installation recommendations.
Training first!
A qualified fluid power installer should prepare and place any system's accumulators. The Fluid Power Society's certification program is a good training source for industry professionals. Training and technical information is also available from both the Fluid Power Distributor's Association and National Fluid Power Association. Most members of the FPDA have on-staff professionals who can assist with design and installation. The Fluid Power Educational Foundation supports programs at many technical schools and universities.
Commissioning
1. Carefully remove the accumulator from the factory packaging. Read and understand all factory labels, stickers, tags, and nameplates attached to the accumulator and the packaging. Also read the factory instructions accompanying the accumulator.
2. If the accumulator is part of a third-party OEM system, read and understand all of their labeling and instructions.
3. Inspect the accumulator for visible damage, and verify the correct part number and thread types.
4. Accumulators are generally shipped from the factory with no precharge. Note that the user must precharge the unit prior to operation.
Don't skimp on safety
Safety should always be at the forefront of any maintenance or installation procedure, but it is a good idea to remember to:
•wear proper eye protection,
• wear steel toed shoes, and
•take proper safety precautions noted on the instructions.
If an accumulator is already installed on a system, pump a small amount of system fluid (10% of accumulator capacity) into the accumulator, at low pressure. (Do not exceed 35 psi). Turn off all power to the system and fully release all hydraulic pressure from the accumulator.
Note: the operator often skips this step, and the result is a broken bladder, or scoured (piston accumulator) cylinder.
If the accumulator is not yet installed (assume zero precharge in the accumulator), place a small amount of fluid (10% of accumulator capacity) into the accumulator. This can be done through the fluid port using a funnel. Lubricate as much of the interior surfaces as possible (including the bladder, if present). This can be accomplished by rolling the unit.
Precharging
This is particularly the case with piston-type accumulators. Here are some things to keep in mind during the precharging procedure:
- Never operate accumulators without a nitrogen gas precharge. For bladder accumulators, this is essential, in order to prevent bladder damage.
- Release all system hydraulic pressure before attempting any maintenance or service. This is not only for safety reasons, but it is the only way to check precharge.
- Use approved charging and gauging equipment for precharging and pressure checks. Make sure your accessories are well maintained and safe. Make sure it is designed for the pressure of the accumulator. Never use anything like a tire gauge.
- Again, it is critical to follow all instructions.
Following are the steps to take to precharge an accumulator:
1. Remove all gas end protectivecaps. Care should be taken not to remove or loosen the gas valve.
2. Attach the gland and nut portion of the charging assembly to a dry nitrogen gas bottle, tighten securely. If the gland and nut do not fit, you are using the wrong gas or wrong pressure!
3. Attach the gas chuck to the accumulator gas valve by hand tightening its swivel hex connection. For top-repairable models, use a TR valve extension.
4. For 3000-psi accumulators, Turn the gas chuck "T" handle clockwise until it stops. This opens the valve core. For 4000 psi and higher accumulators, open the valve by turning its top (small) hex nut counterclockwise.
5. Set the nitrogen bottle gas regulator (if attached) to 35 psig. The use of a nitrogen gas regulator is strongly recommended in order to prevent the bladder from bursting or the piston from jamming.
6. Open the nitrogen bottle gas valve. (If you are not using a nitrogen gas regulator, take care to slowly crack the valve open.) With a regulator, the valve can be opened fully.
7. Precharge slowly (up to 35 psig) using dry nitrogen gas until the bladder or piston chamber is fully inflated. For bladder units, make sure to precharge to a minimum of 30% of the maximum operating pressure. No minimum is required for piston or buoyant float accumulators.
8. Continue precharging slowly to the desired pressure, in 50-psi increments. When completed, wait 10 to 20 minutes — this allows the gas pressure to stabilize. High-pressure gas becomes extremely cold during precharging. This can damage the accumulator seals and give false initial pressure readings. Check the precharge, and relieve any excess gas pressure.
9. For 3,000 psi accumulators, turn the gas chuck " T" handle counterclockwise until it stops. This closes the valve core. For 4,000 psi and higher accumulators, close the valve by turning its top (small) hex nut clockwise ( maximum 70 lb-in. torque).
10. Remove the charging assemblyand check for gas leakage. (The use of gas leak detection fluid or soapy water is recommended.)
11. Tighten the hex jam nut and lock nut fully. Do not twist the gas stem.
12. Replace the protective caps and tighten hand tight.
Use common sense in placement
For most systems, the installation process is a matter of placement, connection, and operation. Placement of the accumulator in the system is generally specified by the system designer. In these cases, the installer should take a reality check to make sure the selected location is feasible. Is there enough space for the unit including mounting hardware and some maneuvering area? Is it sensible? Is the unit close to the work? Is it secured properly? Is the connection of similar size to the line? Accessible? Will maintenance personnel be able to check the unit for leakage or precharge?
The designer may select from a number of available threaded or flanged fluid connections. It is up to the installer to have the correct mating parts and any necessary seals not supplied with the accumulator. The connection should be in the same scale as the piping. (A ¼-in. connection on a six-inch pipe may not be very efficient). Fittings should be of sufficient pressure rating.
At this point, install the accumulator on the system. Make sure the connection is tightened properly, depending on the type of connection. Pressurize the system and check for leakage.
Lastly, operate. It's a good idea to check precharge and to check for leakage during initial operation.
Jeffry A. Schneider, is president of Accumulators, Inc., Houston. Visit their website at www.accumulators.com.


