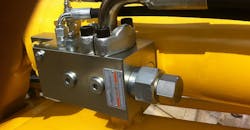
Counterbalance valves are used with cylinders to safely hold suspended loads and deal with over-running loads. This valve can also be used with hydraulic motors and is then commonly called a brake valve. Both counterbalance valves and pilot-operated check valves can be used to lock fluid in a cylinder to prevent drifting. However, a pilot-operated check valve cannot control an over-running load. Whenever uncontrolled movement can occur from an overrunning load, a counterbalance valve should be used.
With no pressure in the line leading to the cylinder’s cap-end port, the counterbalance valve prevents the load from dropping. The check valve lets fluid flow into rod-end port to raise the load.
Here’s What Happens
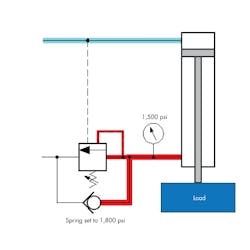
Referring to Fig. 1, when no pressure is applied to the cap end of a cylinder, the counterbalance valve maintains fluid pressure in the rod-end volume. The two pilot lines shown act on different surface areas inside the counterbalance valve. The ratio of these areas is usually 3:1 or 4:1. We’ll assume the 3:1 ratio. The line connected between the counterbalance valve and cylinder’s rod-end port acts on a small piston area (1 in.2) inside the valve. To overcome a spring force of 1,800 lb, the pressure would have to build to 1,800 psi.
Because the load in our example exerts a force producing only 1,500 psi, the valve remains closed. To lower the load, the cap-end volume of the cylinder must be pressurized. The external pilot line will then be pressurized to open the counterbalance valve. This is because the external pilot line acts on a surface area three times (3 in.2) that which the internal pilot pressure acts on.
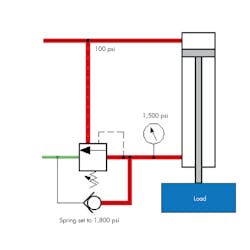
Actually, 1,500 lb of force is already being exerted by the load on the spring. Therefore, the external pilot pressure only has to develop 300 lb of additional force to open the valve. Pressure only has to build to 100 psi on the 3 in.2 surface to develop the necessary 300 lb. of force (Fig. 2).
The pressure and the weight of the load will cause the valve to open, allowing the load to lower. The load dropping too fast would cause a pressure drop in the external pilot line. The counterbalance valve’s spool would then partially close, preventing an uncontrolled drop of the load.
Pressurizing the line leading to the cylinder’s cap-end port also applies pilot pressure to the counterbalance valve. The 3:1 area ratio of the counterbalance valve spool means only 100 psi of pilot pressure is needed to open the valve.
Setup and Troubleshooting
To properly set the counterbalance valve, adjust its spring to its highest setting and the raise the load. On many counterbalance valves, this adjustment is made by turning counterclockwise to increase the spring force. Next, very slowly turn the adjustment in the opposite direction. Caution: For safety, make absolutely sure nothing of value (especially yourself) is underneath the load. Once the load starts to drift down very slowly, turn the adjustment back in the opposite (original) direction until the drifting stops. Turn the adjustment a quarter of a turn in the same direction and then tighten the lock nut.
When a counterbalance valve fails, it usually sticks in the open condition. This results in the load slowly drifting downward. When this occurs, service people often assume the drifting because is caused by cylinder’s piston seals leaking. As a result, they change out or repair the cylinder, which does not solve the problem. It’s usually quicker, easier, and less expensive to check the counterbalance valve.
Contamination can cause the internal check valve or spool to stick open. Before removing the valve, exercise caution and lower the load to the ground. Equally important, be certain that pressure in the hydraulic lines has been bled down to 0 psig. After positively confirming this, remove the valve and inspect for broken springs, trash, etc. Don’t forget to inspect the internal check valve.
This discussion was excerpted from a blog by Hank Ayers, a hydraulics consultant and instructor with GPM Hydraulic Consulting Inc., Monroe, Ga. Click here to view his blog.
About the Author
Hank Ayers
Hydraulics Consultant and Instructor

Leaders relevant to this article:


