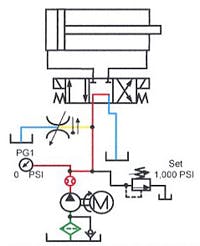
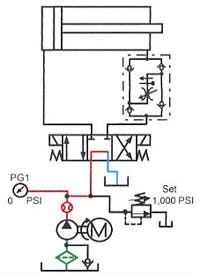
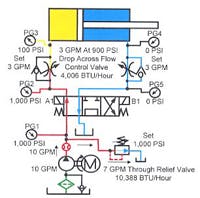
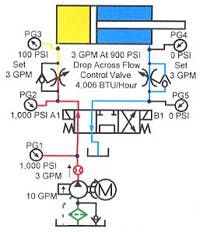
To control the speed of an actuator, most designers use flow controls. Air circuits normally need controlled flow because the plant air compressor is greatly oversized for almost any given circuit. Hydraulic circuits usually have a dedicated power source sized to meet the cycle time so flow restrictors are unnecessary.
Flow controls always generate some heat in hydraulic circuits, so consider some other method of controlling actuator speed where possible. The circuit examples in this chapter explain the types of flow-control systems and how to apply them.
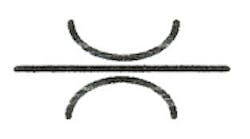
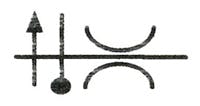
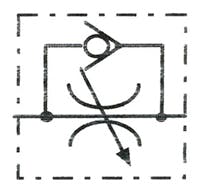
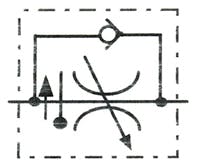
Figures 10-1 and 10-2 show symbols for fixed orifices, rudimentary components that will control flow. A fixed orifice can be a simple restriction in a line or a factory-preset control with pressure compensation and a bypass. Their low cost and the fact that they are tamper-proof are two main reasons for using fixed orifices.
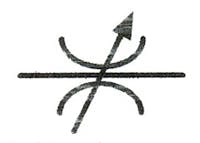
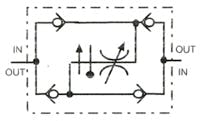
Use the needle valve shown in Figure 10-3 when control of fluid flow in both directions is necessary. Add the check valve arrangement shown in Figure 10-4 when a needle valve needs pressure compensation in both directions. These check valves, sometime referred to as bridge rectifiers, force fluid to flow through the needle valve in the same direction regardless of actuator movement. (Remember, pressure compensation only works in one direction of flow.)
When talking about flow-control hardware, some manufacturers use different terminology. Normally the term flow control refers to an adjustable needle valve with an integral bypass, as pictured in Figure 10-5. This type of flow control meters flow in one direction and allows free flow in the opposite direction. However, some companies identify the flow control in Figure 10-5 as a throttle valve. These companies say a flow control must have a bypass and be pressure-compensated as shown in Figure 10-6.
When a hydraulic actuator needs accurate speed control, use a pressure-compensated flow control. System pressure fluctuations or load changes will cause actuator velocity to change. Regardless of the cause of the pressure differences, flow across the orifice will change unless the flow control is pressure compensated. Only use a pressure-compensated valve when very accurate speed control is needed because its cost is as much as six times that of a non-compensated valve.
Types of flow-control circuits
There are three types of flow control circuits from which to choose. They are: meter-in, meter-out, and bleed-off (or bypass). Air and hydraulic systems use meter-in and meter-out circuits, while only hydraulic circuits use bleed-off types. Each control has certain advantages in particular situations.
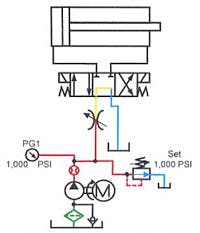
Figure 10-7 shows a meter-in flow-control circuit for a cylinder. Notice that a bypass check valve forces fluid through an adjustable orifice just before it enters the actuator. Figure 10-8 shows an extending hydraulic cylinder and indicates the pressures and flows in various parts of the circuit. With a meter-in circuit, fluid enters the actuator at a controlled rate. If the actuator has a resistive load, movement will be smooth and steady with a hydraulic circuit. This is because oil is almost non-compressible.
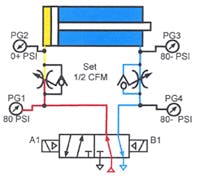
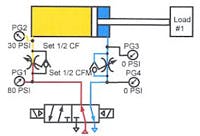
In pneumatic systems, cylinder movement may be jerky because air is compressible. As air flows into a cylinder, as depicted in Figure 10-9, pressure increases slowly until it generates the breakaway force needed to start the load moving. Because the subsequent force needed to keep the load moving is always less than the breakaway force, the air in the cylinder actually expands. The expanding air increases the cylinder speed, causing it to lunge forward. The piston moves faster than the incoming air can fill the cylinder, pressure drops to less than it takes to keep the cylinder moving and it stops. Then pressure starts to build again to overcome breakaway force and the process repeats. This lunging movement can continue to the end of the stroke. A meter-out circuit is the best control to avoid air-cylinder lunging.
In the case of an air system, pressure builds slowly and cylinder movement may be jerky. This jerky movement comes from compressibility of the air. As air enters the cylinder, Figure 10-9, pressure builds slowly until it generates the breakaway force to start the piston moving. Because moving force is always less than breakaway force, air in the cylinder expands. The expanding air speeds up cylinder movement, causing it to lunge forward. This increased speed moves the piston faster than the incoming air can fill the space behind it, so pressure drops to less than it takes to keep it moving and the cylinder stops. After the cylinder stops, pressure starts to build again to develop breakaway force and the process repeats. This lunging movement can continue to the end of the stroke. A meter-out circuit is the best control for an air cylinder.
If the actuator has an overrunning load, such as in Figure 10-10, a meter-in flow control will not work. When the directional valve shifts, the vertical load on the cylinder rod makes it extend. Because fluid cannot enter the cylinder’s cap end fast enough, a vacuum void forms there. The cylinder then free falls, regardless of the setting of the meter-in flow adjustment. The pump will continue to supply metered fluid to the cap end of the cylinder and will eventually fill the vacuum void. After the vacuum void fills, the cylinder can produce full force.
3-speed meter-in circuit
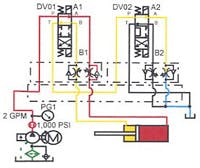
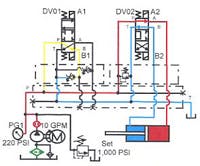
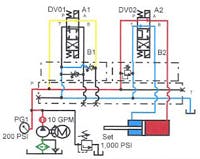
The schematic diagram in Figure 10-11 shows a 3-speed, meter-in flow-control circuit using modular valves. Energizing different combinations of solenoids changes cylinder speed at will. To get additional speeds, add more tandem-center directional valves and flow-control modules like station DV01. The limiting factor would be pressure drop through the valves’ tandem centers. Using a bar manifold and modular valves eliminates many fittings and possible leak sources. As in all meter-in circuits, the pressure-compensated pump shown here generates less heat than a fixed-volume pump.
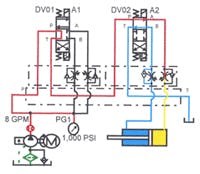
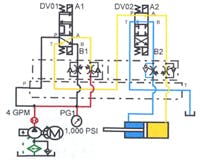
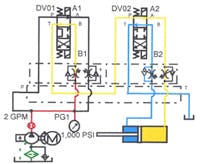
To extend the cylinder at fast speed, shift the valves as shown in Figure 10-12. Energizing solenoid A2 on directional valve DV02 sends fluid through the meter-in flow-control module directly under it to the cylinder’s cap end. This condition is always set for the fastest extension speed. Solenoid A2 stays energized for all extension speeds.
Energizing solenoid B1 on directional valve DV01, Figure 10-13, sends pump flow through the right-hand flow control in the module underneath it. This will produce a slower speed -- here called middle speed. Either solenoid A1 or B1 could produce middle speed, making the opposite solenoid produce slow speed. As with fast speed, the cylinder speed is variable, but never faster than fast speed.
By actuating solenoid A1 on directional valve DV01, fluid passes through the left-hand flow control in the module underneath it. This will produce a different speed here called slow speed.
The cylinder can retract rapidly or at any of the same slower-flow settings as above. By energizing solenoid B2of directional valve DV02, flow will pass through the opposite meter-in flow control. This means fast-speed retracting can be different from the extending speed. The middle and slow speeds will be at the same flow rate as extension. Cylinder speed during these reduced flows will be somewhat faster due to the decreased rod-end area.
A simple manifold can give multiple speeds inexpensively, while eliminating potential plumbing leaks.
Note: Select a valve for DV01 that can withstand tank-line backpressure.
Speed changes with this meter-in circuit will be smooth because the cylinder can coast while slowing down. (It also is possible that the cylinder could cavitate when slowing down, so an anti-cavitation check valve may be needed.)
Fig. 10-14: Three -speed meter-in flow-control circuit using modular valves mounted on bar manifold – extending at slow speed.
Meter-in flow control of a running-away load
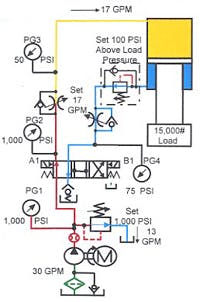
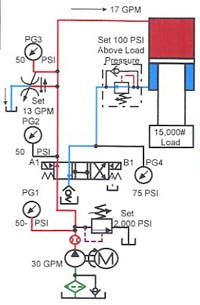
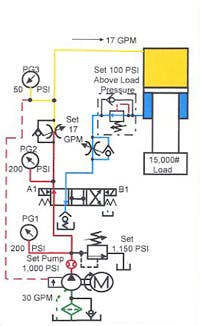
Figures 10-15 and 10-17 show a running-away load controlled by a meter-in circuit and counterbalance valves. The meter-in flow control works exactly as explained previously, while a counterbalance valve makes cylinder movement resistive. (See Chapter 5 for an explanation of counterbalance valves.) Figure 10-16 pictures a bleed-off flow control circuit that gives the same results as a meter-in circuit -- without most of the heat generation.
Fig. 10-15: Meter-in flow-control circuit for vertical cylinder extending with over-running load. Counterbalance valve prevents load from falling.
A meter-in flow control circuit for an over-running load is not the normal design but it may be necessary when the circuit has a pressure switch or a sequence valve.
In any meter-in circuit with a fixed-volume pump, the wasted energy will heat the fluid. In the circuit in Figure 10-15, almost 95% of the power used by the system becomes heat. In this circuit, fluid from the pump enters the cylinder as fast as the meter-in flow control allows. A counterbalance valve at the rod-end port keeps the cylinder from running away as it extends.
Fig. 10-16: Bleed-off or bypass flow-control circuit for vertical cylinder extending with overrunning load. Counterbalance valve prevents load from falling.
.To save energy while using a fixed-volume pump, the circuit in Figure 10-16 works well. A bleed-off or bypass flow control greatly reduces the amount of wasted energy. With a bleed-off circuit, excess pump flow goes to tank at the pressure required to move the cylinder. In the circuit in Figure 10-16, pressure would be approximately 50 psi as the cylinder extends. The extension-stroke speed is still infinitely variable, while pressure in the cylinder cap end line never goes higher than that caused by load resistance.
Fig. 10-17: Meter-in flow-control circuit with load-sensing pressure-compensated pump and vertical cylinder extending with over-running load. Counterbalance valve prevents load from falling.
Figure 10-17 shows another way to reduce energy loss and heat generation – using as load-sensing, pressure-compensated pump in conjunction with a meter-in flow-control circuit. A sensing line, teed into the cylinder cap-end line after the meter-in flow control, transmits pressure information to the pump. With a load-sensing, pressure-compensated pump, pressure at the pump outlet stays 150 to 200 psi higher than the load until it tries to go above the compensator’s pressure setting. The only energy loss here is the 150- to 200-psi pressure drop across the flow control at the volume set. (Heat generation within a load-sensing pump circuit is explained later in this Chapter.)
When meter-in circuits are necessary
In some cases a meter-in circuit is the only way to control the speed of an actuator -- even for pneumatic devices. Figures 10-18 through 10-21 show several instances requiring meter-in circuits.
Fig. 10-18: Meter-in flow-control circuit with pressure switch for end-of-stroke indication.
Many machine circuits use pressure switches to indicate when an actuator meets resistance. If pressure in the actuator builds prematurely, the machine cycle gets out of phase. With the meter-in circuit shown in Figure 10-18, pressure in the cylinder will be just enough to move the cylinder and its attachments until it reaches the load. With a meter-out circuit, pressure in the cylinder cap end would build as soon as the directional valve shifts, tripping the pressure switch long before the cylinder contacts the load.
Fig. 10-19: Meter-out flow-control circuit with pressure switch for end-of-stroke indication.
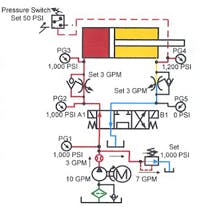
However, it is possible to use a pressure switch with a meter-out flow control circuit. In Figure 10-19, notice that the pressure switch is on the cap-end line to the cylinder. It passes a signal when the cylinder cannot extend farther. Notice also that the pressure switch setting is very low (50 psi). While the cylinder is moving, oil flowing from the cylinder head-end port remains pressurized by the meter-out flow control. When the cylinder contacts the load, pressure in the head-end port drops, actuating the pressure switch and sending a signal. (Use a normally open, 3-way, pilot operated, spring-return directional valve in place of the pressure switch to produce an air or hydraulic pilot signal.)
The pressure-decaying circuit in Figure 10-19 works well in pneumatic circuits because metering air flow out provides good control. Several companies furnish air logic elements designed specifically for this type of circuit.
Fig. 10-20. Meter-in flow-control circuit with sequence valve for end-of-stroke indication.
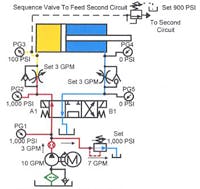
Sequence valves often are used to start a second actuator after a cylinder meets resistance and builds tonnage. With the meter-in flow control shown in Figure 10-20, pressure in the cylinder cap end increases when -- but not before -- the cylinder contacts the work. Pressure at the sequence valve’s inlet stays lower than its spring setting while the actuator is moving. (With a meter-out circuit, pressure in the cylinder’s cap end would go to system pressure when the directional valve shifts. Because of this, flow to the secondary circuit would take place prematurely.
The vertical single-acting, weight-return cylinder shown in Figure 10-21 needs meter-in control as it extends. This will be the case even if it is a pneumatic cylinder where meter-out control works best. For a different retraction speed, use a second meter-out flow control (as shown in Figure 10-21).
Fig. 10-21. Meter-in flow-control circuit for a single-acting cylinder extending.
Note: A pressure switch or a sequence valve will only indicate that pressure has reached a certain level. What caused the pressure build-up is unimportant. If the actuator positively has to be at a certain position before the next function starts, do not use a pressure-sensing device. Always use a limit switch. (Use a pressure switch or sequence valve in series with the limit switch if cylinder position and force are both important.)
Action of a meter-in air circuit with a varying load
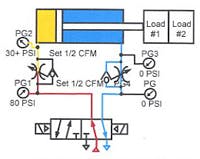
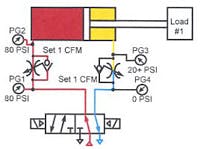
When using a meter-in circuit on an air cylinder with a variable load, movement will not be consistent. Depending on the required range of forces, movement may be smooth, the cylinder may over-speed, or it may even stop. In Figure 10-22, the cylinder is moving smoothly at a pressure difference of 30 psi. (It takes 30 psi in the bore size being used to generate the force to move the load.) If the load remains constant, the cylinder can — and probably will — advance smoothly.
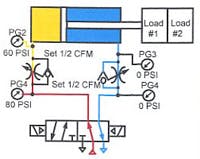
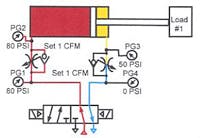
When the load doubles, as in Figure 10-23, 30 psi is not enough to keep the cylinder moving. At this point the cylinder will stop until pressure in the cap end reaches 60 psi. (The meter-in flow setting determines how long this takes.)
Once pressure in the cylinder cap end reaches 60 psi, Figure 10-24, the cylinder starts moving again. If the higher load stays constant, movement is steady.
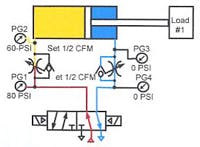
When the second load is reduced, as diagrammed in Figure 10-25, 60 psi in the cap end is more pressure than needed. This high pressure will cause the cylinder to lunge forward and, as a result, pressure in the cap end will start to decay. The amount of lunge is in direct proportion to the total volume of air in the cylinder’s cap end and the piping leading to it.
Next, as Figure 10-26 shows, once decompression reaches 30 psi, the cylinder slows to its original speed. If this stop/lunge/over-speed problem is intolerable and air is the required power source, add some method of oil control to the circuit. (See Chapter 3 on air-oil circuits.)
Meter-out flow controls
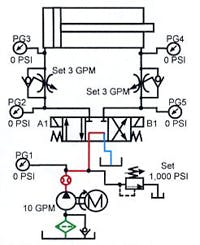
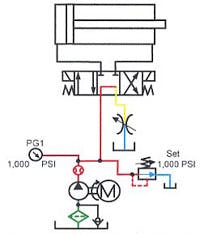
Meter-out controls restrict fluid leaving the cylinder to retard the cylinder’s movement. This type of flow-control circuit works for any type of load -- and works best with air-operated devices. Figure 10-27 shows a meter-out flow-control circuit in the at rest condition.
In Figure 10-28, the directional valve has shifted and the cylinder starts to extend. Fluid in the cap end of the cylinder is at system pressure and the relief valve is dumping excess pump flow to tank. Pressure at the head end of the cylinder will be at system pressure or higher according to the rod size and force required to move the load. The action of meter-out flow controls is smooth and steady in hydraulic circuits.
Fig. 10-28. Meter-out flow-control circuit – with cylinder extending.
Figure 10-29 shows the pressure pattern of an air cylinder while it is extending. By restricting flow out of the cylinder, the action will be smooth when the load remains constant. (Figures 10-35 through 10-39 show the action of an air cylinder that is moving a changing load.)
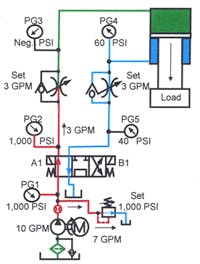
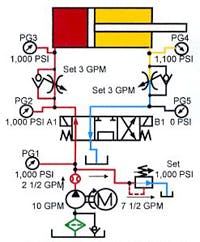
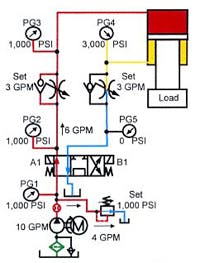
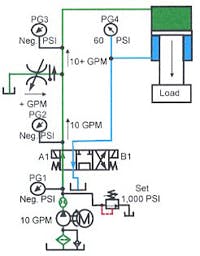
In Figure 10-30, meter-out flow controls are controlling the load on a down-acting vertical cylinder. This over-running load moves steadily because fluid flow leaving the cylinder is restricted. The meter-out circuit keeps the load from running away, but depending on the load and the rod size, there could be excessive pressure in the cylinder’s head end. Notice that the rod-end pressure is 3000 psi when extending. This is because the rod is oversize (2:1) and the load is heavy. At a relief valve setting of 3000 psi, this head end pressure could be as high as 7000 psi.
Fig. 10-29. Pneumatic meter-out flow-control circuit – with cylinder extending.
When using a meter-out system with a running-away load, check load-induced pressure and hydraulic-force-induced pressure at the rod end. This pressure can be much higher than components’ rating -- even when the relief valve setting is well below maximum rated pressure.
Fig. 10-30. Meter-out flow-control circuit – cylinder extending with over-running load.
Three speed meter-out circuit
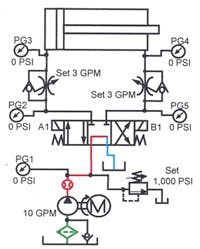
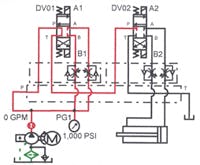
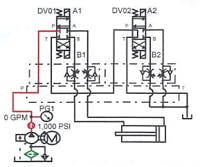
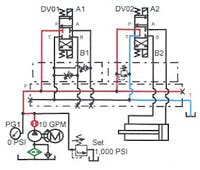
The schematic diagram in Figure 10-31 shows a 3-speed meter-out flow-control circuit using modular valves. Energizing different combinations of solenoids changes speeds at will. To get additional speeds, add more tandem-center directional valves and flow-control modules like station DV02. The limiting factor would be pressure drop through the valves’ tandem centers. Using a bar manifold and modular valves eliminates many fittings and possible leak sources. As in all meter-out circuits, the pressure-compensated pump shown here generates less heat than a fixed-volume pump.
Fig. 10-31. Three-speed meter-out flow-control circuit using modular valves on bar manifold – at rest with pump running.
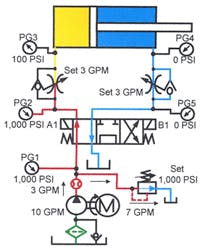
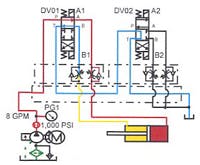
Figure 10-32 shows the cylinder extending at fast speed. Solenoid A1 of directional valveDV01 shifts and fluid from the cylinder passes through the meter-out flow-control module directly under it. This flow path will always produce the fastest speed.
Fig. 10-32. Three -speed meter-out flow-control circuit using modular valves on bar manifold – cylinder extending at fast speed.
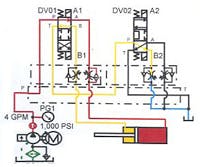
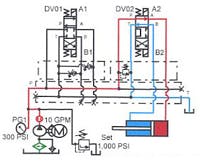
By energizing solenoid B2 on directional valve DV02, as in Figure 10-33, return flow from the cylinder passes through the left flow control in the module underneath it. This will produce a slower speed -- here called middle speed. Either solenoid A2 or B2 could be assigned to middle speed (making the opposite solenoid produce slow speed). As with fast speed, the rate of cylinder movement is variable, except it can never be faster than fast speed.
Fig. 10-33. Three -speed meter-out flow-control circuit using modular valves on bar manifold -- cylinder extending at middle speed.
By actuating solenoid A2 on directional valve DV02, Figure 10-34, oil from the cylinder passes through the right flow control in the modular valve underneath it. This will be a different speed --here called slow speed.
Fig. 10-34. Three -speed meter-out flow-control circuit using modular valves on bar manifold -- cylinder extending at slow speed.
The cylinder can retract at fast speed or at any of the same slower flow settings as above. By energizing solenoid B2 of directional valve DV01, flow will pass through the opposite meter-out flow control. This means fast speed can be different when the cylinder extends. The middle and slow speeds will be at the same flow rate as extend. Cylinder speed during these reduced flows will be somewhat slower due to increased area on the cap end.
When changing from a faster to a slower speed, the action will be abrupt. This is because the meter-out circuits control the flow exiting the cylinder.
Note: A simple manifold can set multiple speeds inexpensively while eliminating plumbing leaks. Also, be sure to use a valve for DV01 that can withstand tank-line backpressure.
Meter-out pneumatic circuit with a variable load
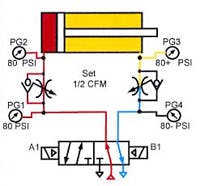
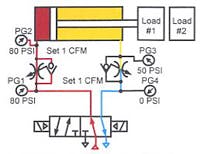
When using a meter-out circuit on an air cylinder with a changing load, movement will not be consistent. According to the amount of force change required, movement can range from smooth, to stop, to lunging. (Note that in Figures 10-35 through 10-39 there is no allowance made for rod differential.)
Fig. 10-35. Pneumatic meter-out flow-control circuit – with loaded cylinder extending slowly and smoothly toward second equal load.
In Figure 10-35, a loaded air cylinder is stroking smoothly at a pressure difference of 30 psi between its cap and head ends. (At the bore size for this example, it takes a 30-psi difference to generate enough force to move the load). If the load remains constant, the cylinder usually will advance smoothly.
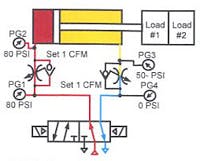
Fig. 10-36. Pneumatic meter-out flow-control circuit – as cylinder contacts second load and stops while rod-end pressure drops.
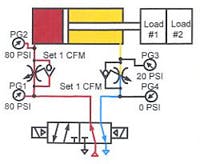
But when the load is doubled, as shown in Figure 10-36, a difference of 30 psi across the piston is not enough to keep the cylinder moving; the cylinder stops while pressure in the rod end decreases to about 20 psi. The speed of the pressure decay is in direct proportion to how quickly air discharges through the flow control. Once pressure in the cylinder rod end reaches 20 psi, Figure 10-37, the cylinder will start moving again. If the additional load stays constant, movement is smooth and steady again.
Fig. 10-37. Pneumatic meter-out flow-control circuit – with cylinder moving both loads after rod-end pressure has dropped.
When the second load is removed, as in Figure 10-38, 20 psi in the rod end is less pressure than needed to hold the piston back. At this time the cylinder will lunge forward until the pressure in the rod end increases to about 50 psi. The amount of lunge is in direct relation to the volume of air in the cylinder rod end and the piping to it. As Figure 10-39 shows, once air in the rod end again compresses to about 50 psi, the cylinder returns to normal speed.
Fig. 10-38. Pneumatic meter-out flow-control circuit – cylinder lunging forward after second load is removed. Pressure in rod end is increasing to level that will hold cylinder back.
Fig. 10-39. Pneumatic meter-out flow-control circuit – after return to original conditions, cylinder extends slowly and smoothly with single load.
If this stop-and-lunge problem is intolerable and air is the power source, add a method of oil control to the circuit. (See Chapter 3 on air-oil circuits for ways to overcome the problem.)
Bleed-off (bypass) flow controls
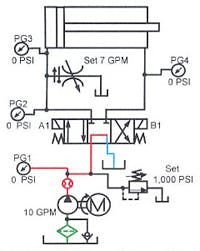
Figure 10-40 shows a bleed-off or bypass flow-control circuit in the at-rest condition. This type of flow control circuit bleeds off excess fluid to tank. A bleed-off circuit works best in hydraulic circuits using fixed-volume pumps. And a bleed-off circuit only works with multiple actuators if they operate one at a time.
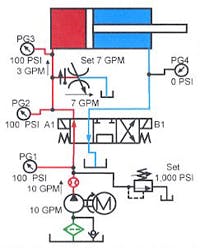
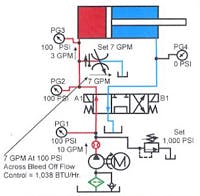
When oil passes to tank through a pressure-compensated flow control, cylinder movement will slow while system pressure only climbs high enough to move the load. (While this arrangement wastes energy, the amount is minimal.)
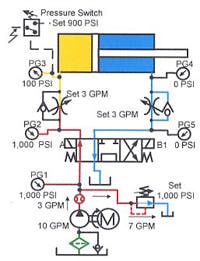
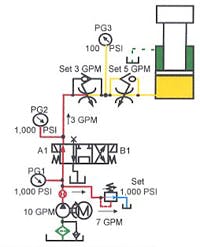
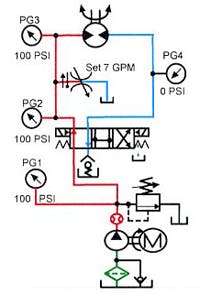
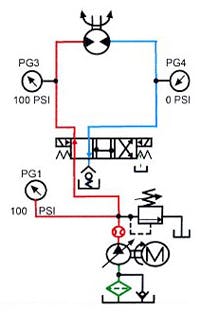
The cylinder in Figure 10-41 is extending at 3 gpm while 7 gpm passes to tank through the pressure-compensated needle valve. Because the resistance of the cylinder and load is only 100 psi, the energy needed is very low. The 3 gpm flowing to the cylinder generates no heat because it is doing useful work. The 7 gpm going to tank at a 100-psi pressure drop is the only wasted energy. If the cylinder were to contact a load that requires 300 psi then the whole system would climb to 300 psi. Energy losses would increase, but would still be much less than those in a meter-in or meter-out system.
Even with a pressure-compensated flow control valve, cylinder speed will change slightly as pressure increases. This is because pump flow decreases slightly when pressure increases. The flow control still passes 7 gpm. (All pump inefficiency losses reduce cylinder speed.) When the cylinder bottoms out, pressure increases until the relief valve opens. At this time all input energy generates heat. Note that this only happens when the cylinder must maintain force while stalled.
As with meter-in circuits, bleed-off circuits do not work with a running-away load. Figure 10-42 shows the cylinder extending rapidly and fully when the directional valve shifts. (When using a bleed-off circuit with a running-away load, use the counterbalance circuit shown in Figure 10-16. With a counterbalance valve creating resistance, oil entering the cylinder sets its speed as with any resistive load.)
Heat generation can be minimal if the cylinder force is low while extending and retracting. Figure 10-43 shows only 1038 BTU/hr loss -- even with 7 gpm being bled to tank. Normally, use a bleed-off circuit where only a small amount of fluid goes to tank to fine tune actuator speed.
A bleed-off circuit requires a pressure-compensated flow control to keep the cylinder from slowing as pressure increases. Without a pressure-compensated flow control, cylinder speed slows as load increases and speeds up when load decreases. With a bleed-off flow-control circuit, turn the flow control clockwise to increase speed and counter-clockwise to decrease speed.
Three-speed bleed-off circuit
Figure 10-44 shows a 3-speed bleed-off circuit, controlled by energizing different solenoids. To get additional speeds, add more blocked-center directional valves and flow modules like DV01. The limiting factor would be the number of stations on the manifold. (Using a bar manifold and modular valves eliminates many fittings and possible leaks.) Use this circuit with fixed-volume hydraulic pumps only.
Fig. 10.44. Three-speed bleed-off flow-control circuit using modular valves on bar manifold – at rest with pump running.
To extend the cylinder at fast speed, as in Figure 10-45, shift solenoid A2 on directional valve DV02. All pump output flows to the cylinder to produce fast speed. This condition always is the highest speed. Adding a bleed-off modular flow control under DV02 will allow adjustment of fast speed. Use of a primary adjustment at DV02 would slow both other speeds.
Fig. 10.45. Three-speed bleed-off flow-control circuit using modular valves on bar manifold – cylinder extending at full speed.
Energizing solenoid B1 on directional valve DV01, as in Figure 10-46, directs a portion of pump flow to tank through the module underneath it. The cylinder speed varies, but it can only be slower than fast speed. This is middle speed. Either solenoid A1 or B1 could produce middle speed while the opposite solenoid would produce slow speed.
Fig. 10.46. Three-speed bleed-off flow-control circuit using modular valves on bar manifold -- cylinder extending at middle speed.
Actuating solenoid A1 on directional valve DV01, as in Figure 10-47, bleeds oil to tank through the other flow control, resulting in slow speed.
Fig. 10.47. Three-speed bleed-off flow-control circuit using modular valves on bar manifold -- cylinder extending at slow speed.
The cylinder can retract at fast speed or at any of the same slower flow settings as above. Energizing solenoid B2 on directional valve DV02 sends pump flow through the directional valve directly to the cylinder for fast speed. The middle and slow speeds give the same flow rate as extend. Cylinder speed during these reduced flows is somewhat faster due to the decreased area on the rod end.
Note: Speed change with a bleed-off circuit is very smooth. The cylinder decelerates smoothly, although a slight jerk or shock may be evident when changing from slow to a faster speed.
Different locations for flow controls
Figures 10-48 through 10-51 suggest other possible locations for flow-control devices in circuits. Figure 10-48 shows a meter-in needle valve in the pump line. At first, it appears this arrangement results in equal speed in both directions of travel. While it does slow the stroke in both directions, the speeds are not identical with a single-rod cylinder. As the cylinder advances, metered oil flows to the cap-end area (4.91-in.2 for a 2.50-in. bore). With a 1.375-in. diameter rod, the head-end area would only be 3.43 in.2 Thus, with the same flow entering the different areas, retraction speed would be faster.
Fig. 10.48. Meter-in flow-control circuit with needle valve in pump line.
Note that all of the same precautions given previously for meter-in circuits apply to this single meter-in needle valve as well. In addition, some solenoid valves cannot stand backpressure on the tank line, so use caution when applying this circuit.
The circuit in Figure 10-49 locates a single meter-out needle valve in the tank line. Again extension and retraction speeds appear to be identical. But as with the tank-line meter-in circuit, piston area differences when extending and retracting result in different speeds. The single meter-out flow-control circuit is faster on the extension stroke with a single-rod cylinder.
Fig. 10.49. Meter-in flow-control circuit with needle valve in tank line.
The pump-line bleed-off circuit diagrammed in Figure 10-50 is identical in action to the meter-in circuit in Figure10-48. If a fixed-volume pump supplied both circuits, the bleed-off circuit would generate less heat.
Fig. 10-50. Bleed-off flow control circuit with pressure-compensated needle valve teed into pump line.
To get identical speed in both directions of cylinder travel, use the circuit in Figure 10-51. Locating a needle valve in the rod- or cap-end line controls the same cylinder area extending and retracting. This circuit meters in flow during one direction of travel and meters flow out in the opposite direction.
Single-rod cylinders have different areas on the two faces of the piston so pressure drop across the needle valve is different when extending and retracting. The circuit in Figure 10-51 has a higher pressure drop across the needle valve orifice when the cylinder is extending. The higher pressure drop has no effect on the pressure-compensated needle valve in this circuit due to the rectifier check valve shown. The rectifier check valve allows oil to flow through the needle valve in the same direction when the cylinder extends or retracts. Cylinder speed will stay the same with this setup, even though pressure drop differs during extension and retraction.
Fig. 10-51. Meter-in/meter-out flow-control circuit with pressure-compensated needle valve and rectifier on rod-end cylinder port.
Heat generation in hydraulic flow-control circuits
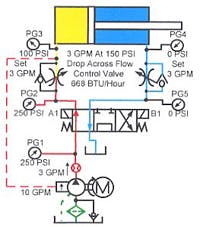
Many of the circuit examples in this chapter use fixed-volume pumps. Fixed-volume pumps always generate heat when used with any flow-control circuit. Also, flow controls always generate some heat regardless of the type pump used. Figures 10-52 through 10-55 show meter-in flow-control circuits and explain how different type pumps affect heat generation.
Checking horsepower loss is one way to determine the amount of heat generated by a circuit. To figure horsepower in a hydraulic system use the formula:
(horsepower) = 0.000583 (pressure in psi) (flow in gpm).
Multiply the horsepower by 2545 to calculate the amount of heat produced in British Thermal Units per hour.
Fig. 10-52. Meter-in flow-control circuit with fixed-volume pump – cylinder extending.
In the circuit in Figure 10-52, 7 gpm flows across the relief valve at 1000 psi. When this oil reaches system pressure, it flows to tank without doing useful work. If you multiply 0.000583 (7 gpm)(1000 psi)(2545 BTU/hr), the heat loss comes to 10,386 BTU/hr. Add to this the heat loss due to the 3 gpm at 900-psi pressure drop passing through the flow control (4006 BTU/hr). Thus, when the cylinder is moving under the conditions shown in Figure 10-52, more than 14,000 BTU/hr of energy turns into heat. The maximum heat that the unit could produce is 0.000583(10 gpm)(1000 psi)(2545 BTU/hr) or 14,837 BTU/hr. Therefore, approximately 97% of the system’s energy is wasted heating the fluid.
Fig. 10-53. Meter-in flow-control circuit with pressure-compensated pump – cylinder extending.
The pressure-compensated pump in Figure 10-53 produces only the flow needed, so there is no oil going over a relief valve. The only heat loss in this circuit is the 900 psi across the flow-control valve. There are 10,000-BTU/hr fewer entering the system just by changing the type of pump.
Fig. 10-54. Meter-in flow-control circuit with load-sensing, pressure-compensated pump – cylinder extending.
To cut even more heat from the system, the circuit in Figure 10-54 uses a load-sensing pressure-compensated pump. This pump has a sensing line that monitors the pressure required to move the cylinder, then sets the compensator 150 to 200 psi higher. With a 100-psi cylinder requirement, the pump would operate at approximately 250 psi. This low pressure drop across the meter-in flow control generates a heat loss of just 668 BTU/hr.
To sense the load at both ends of the cylinder, or if there is more than one cylinder to control, the sensing lines come back to the pump through check valves. These check valves allow the pump to see the system’s highest pressure requirement and set the pump pressure 150 to 200 psi above it.
When using a load-sensing pump, always use a meter-in flow-control circuit. A meter-out circuit shows pressure at both ends of the cylinder all the time it is moving. With pressure at the load-sensing port, the pump would go to compensator setting and stay there. (For more information on load-sensing pumps, look in Chapter15.)
Fig. 10-55. Meter-in flow-control circuit with variable-volume pump – cylinder extending.
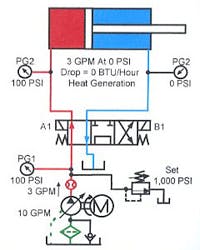
Heat generation for the circuit in Figure 10-55 is the lowest possible when variable speed is necessary. In this circuit, a variable-volume pump set for 3-gpm flow replaces the flow controls. Because the cylinder uses all the flow produced, system pressure only goes to the 100 psi required to move the cylinder. There is no excess horsepower, so no heat is generated. (In actual practice, pump inefficiency, pressure drop in the lines, and friction between parts generate some heat. These losses may cause the system temperature to rise 5 to 15° above ambient temperature.)
When practical, a variable-volume pump provides the best way to control actuator speed. Variable-volume pumps may require some electronic controls if there is more than one cylinder, but lower operating cost for the life of the machine quickly offsets this one-time first cost.
Motor-type flow-divider speed control
There are some ways to use a fixed-volume pump and motor-type flow dividers to change speeds with minimal heat generation as shown in Figures 10-56 through 10-63. These circuits will only give fixed preset speeds without changing hardware.
Fig. 10-56. Meter-in flow-control circuit with motor-type flow divider (to minimize heat) – cylinder extending at slow speed.
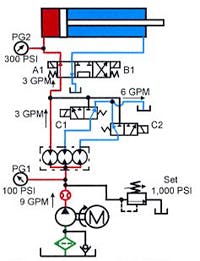
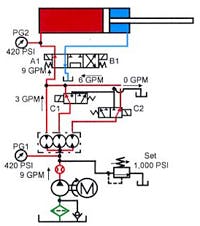
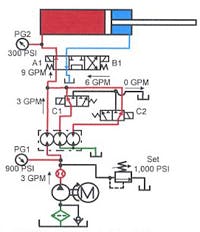
Figure 10-56 shows a 3-speed flow-control circuit using a motor-type flow divider. Here the cylinder is extending at slow speed. With the circuit set up as shown, it defaults to slow speed. Notice that there are no flow controls. To split pump flow evenly and reduce energy loss, use a motor-type flow divider at its outlet. Each outlet of the flow divider will put out about 3 gpm.
In Figure 10-56 the cylinder is receiving 3 gpm of oil and requires a pressure of 300 psi to move. Notice the pump pressure reads 100 psi. This will happen because the flow divider is taking in 9 gpm, but using only 3 gpm to do work. The other two 3-gpm flows go back to tank at 0 psi. While it appears these other flows waste energy, they are actually transferring their energy through the motor flow divider to the left-hand motor. The left-hand motor becomes a pump with a 100-psi inlet and two motors driving it to 300 psi. In flow-divider circuits, the average of the sum of the outlets always will be the inlet pressure. In this case: (300 psi) + (0 psi) + (0 psi) = (300 psi)/3 = (100 psi) With this system, speed slows but energy loss is only the inefficiency of the parts used.
Fig. 10-57. Meter-in flow-control circuit with motor-type flow divider (to minimize heat) – cylinder extending at middle speed.
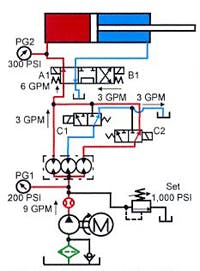
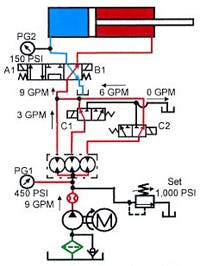
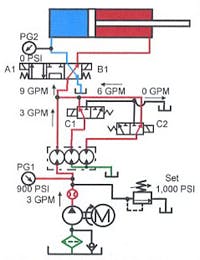
To get mid speed, the directional valves shift as shown in Figure 10-57. By energizing solenoid C2 on the right-hand 3-way valve, an extra 3 gpm goes to the cylinder to produce mid speed. Notice that the pump pressure goes to 200 psi as the cylinder speed doubles. Still there is only hardware inefficiency to waste energy, so the system runs cool.
Fig. 10-58. Meter-in flow-control circuit with motor-type flow divider (to minimize heat) – cylinder extending at fast speed.
To make the cylinder extend at fast speed, shift the directional valves as shown in Figure 10-58. By energizing solenoids C1 and C2, both 3-way valves shift to send all pump flow to the cylinder. Because the cylinder is at fast speed, pump and cylinder pressure are the same.
To retract the cylinder at fast speed, shift solenoids B1, C1, and C2 as shown in Figure 10-59. Energizing one or more solenoids in the retract mode gives different speeds that are nearly the same as when extending. (If the flow divider had more and/or unequal size motors, selection of a combination of speeds by selecting different flow outputs is possible.) Notice that this circuit is tamperproof. To change the preset speeds, the flow divider and/or pump must be changed.
Fig. 10-59. Meter-in flow-control circuit with motor-type flow divider (to minimize heat) – cylinder retracting at fast speed.
Any flow-divider circuit will intensify pressure. If the cylinder in Figure 10-56 stalled, the pressure would continue to climb. When it reached the relief valve setting, pressure at the cylinder would be 3000 psi. A second pressure-relief valve installed between the flow divider and the pump port of the main directional valve could be set at a safer pressure in case the cylinder stalls.
Another motor-type flow-divider speed control
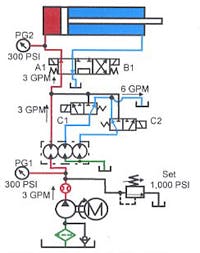
Figures 10-60 through 10-63 show a different type of motor flow-divider circuit for variable speed. This circuit uses a smaller pump, electric motor, and tank to give the same speed but less force at high speed. Notice there is a 3-gpm pump feeding one section of the flow divider. As this section of the flow divider turns, the other two sections turn and pump fluid directly from the tank. In Figure 10-60 the two right-hand sections of the flow divider are only circulating oil. All pump flow is going to the cylinder, which is operating at slow speed. In this condition, the cylinder is capable of generating its highest tonnage. Notice the cylinder requires 300 psi to move it and the pump is showing 300 psi.
Fig. 10-60. Meter-in flow-control circuit with motor-type flow divider (to minimize heat) – cylinder extending at slow speed.
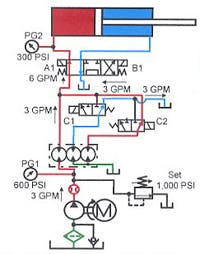
The cylinder speeds up when solenoid C2 on the left-hand 3-way valve is energized, as in Figure 10-61. Now, one flow-divider section sends its oil to the cylinder along with pump flow. The cylinder goes to mid speed and pump pressure climbs to 600 psi.
Fig. 10-62. Meter-in flow-control circuit with motor-type flow divider (to minimize heat) – cylinder extending at fast speed.
To get full speed from the cylinder, energize solenoid C1 on the right hand 3-way valve, as shown in Figure10-63. Now all three sections of the flow divider feed the cylinder. The cylinder strokes at fast speed and pump pressure climbs to 900 psi.
If the pressure required to move the cylinder to the load is low, this system works well. There is enough flow to move rapidly at low pressure and enough pressure at low flow to do the work.
Note: Standard gear-motor flow dividers are noisy. In the two circuits just discussed, the flow divider runs continuously. The high noise level may be detrimental in some locations.
Fig. 10-63. Meter-in flow-control circuit with motor-type flow divider (to minimize heat) – cylinder retracting at fast speed.
Controlling speed of hydraulic motors
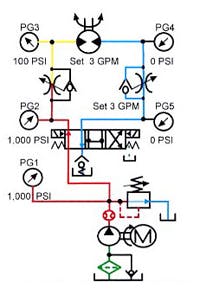
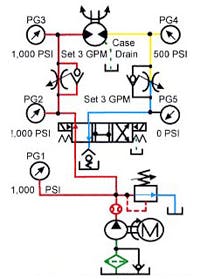
Figures 10-64 through 10-67 show schematic diagrams of flow-control circuits for hydraulic motors. The circuits in Figures 10-64 and 10-66 are the best for this purpose. In both of these circuits the motor only has pressure on one port. This arrangement provides the motors’ internal leakage with a path to tank at minimal backpressure. High backpressure in a motor can cause wear on the motor shaft seal and leakage. Motors with external case drains eliminate high case backpressure at both ports, but motor drain flow increases.
For a running-away load, the schematic diagram shown in Figure 10-65 is best. When using a meter-out circuit, specify a high-pressure shaft seal due to backpressure at the motor outlet port. A case drain to let internal leakage go directly to tank can take the place of the high-pressure shaft seal, and is preferred in most cases.
Fig. 10-64. Meter-in flow-control circuit for hydraulic motor.
The bleed-off circuit in Figure 10-66 will generate the least heat of the first three. The only problem is that the motor will slow a little as pressure increases -- due to pump and motor inefficiency. The pressure-compensated flow control will maintain a constant bypass of fluid as pressure climbs. However, pump output will decrease and motor bypass will increase, causing the motor to slow. Use high-efficiency components to keep this speed change minimal.
Fig. 10-65. Meter-in flow-control circuit for hydraulic motor. (Requires high-pressure seals and case drain, as shown.)
The circuit in Figure 10-67 is the most efficient of the four in this section. With a variable-volume pump, pressure is always just what the load requires, backpressure is negligible, and heat generation is minimal. To obtain very accurate control, use a servo-controlled pump with electronic feedback from the motor.
Any of the flow-control circuits for cylinders works well with motors. The main difference is dealing with leakage. Most cylinders have dynamic seals that do not leak. Also, there are no areas to trap internal leakage in a cylinder.
Fig. 10-66. Bleed-off or bypass circuit for hydraulic motor.
Three-port flow control
Figures 10-68 through 10-70 diagram how to control the output of a fixed-volume pump with a 3-port flow control. A 3-port flow-control circuit operates the same as a bleed-off flow control. The main difference is that a 3-port flow control does not need an external relief. The flow control’s integral relief valve protects the pump and makes the flow control pressure compensated.
Fig. 10-67. Meter-in flow-control circuit for variable-volume pump supplying hydraulic motor.
A 3-port flow control used with a running away load requires a counterbalance valve (as was shown in Figure 10-15). Normal use is with a single-actuator circuit because it controls maximum pump pressure and flow, and affects all actuators in a circuit.
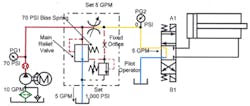
Figure 10-68 shows a typical 3-port flow-control circuit at rest with the pump running. Flow from the pump is 10 gpm. The needle valve is set for 5 gpm. The bias spring on the main relief valve is about 25 to 70 psi (according to the manufacturer). In the at rest condition, 5 gpm flows to tank through the directional valve and 5 gpm flows to tank through the main relief valve (at a pressure drop of approximately 70 psi). The normally closed pilot operator on the relief valve stays closed until system pressure reaches its setting.
Fig. 10-68: Three-port flow-control circuit at rest.
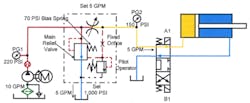
When the cylinder starts to move, as in Figure 10-69, its resistance will increase pressure at the outlet of the flow control. Pressure build-up sensed through the fixed orifice acts on the main relief valve with the 70-psi spring. Any resistance from the actuator -- plus the 70 psi of the bias spring -- will increase pressure at the pump. The constant 70-psi pressure drop will maintain an accurate and constant flow to the cylinder while it moves. This 3-port flow control generates very little heat when the pressure requirement is low. It works the same as a bleed-off flow control except it has a built in relief valve.
Fig. 10-69: Three-port flow-control circuit with cylinder extending.
When the cylinder reaches the load, as in Figure 10-70, pressure increases. As pressure at the cylinder rises, the main relief valve senses it and maintains a 70-psi differential right up to the setting of the pilot operator. When cylinder pressure reaches 1000 psi, all pump flow will go to tank across the main relief valve. The pilot-operator section of the 3-port flow control sets maximum system pressure.
Fig. 10-70: Three-port flow-control circuit with cylinder stalled.
The 3-port flow control is similar to the priority flow divider that will be explained in Chapter 11. The main difference between these two valves is that tank flow always goes directly to tank on a 3-port flow control. Any backpressure in the tank line will add to the maximum system pressure. A priority flow divider can use the excess flow to operate other valves and actuators. Relief valves in the lines leaving the priority flow divider protect the circuits from overpressure.
