Fluid power reservoirs
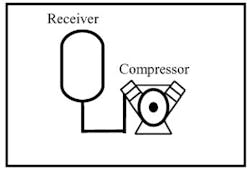
Fluid power systems require air or a liquid fluid to transmit energy. Pneumatic systems use the atmosphere -- the air we breathe -- as the source or reservoir for their fluid. A compressor takes in atmospheric air at 14.7 psia, compresses it to between 90 and 125 psig, and then stores it in a receiver tank. A receiver tank is similar to a hydraulic system’s accumulator. A receiver tank, Figure 6-1, stores energy for future use similar to a hydraulic accumulator. This is possible because air is a gas and thus is compressible. A receiver tank is a pressure vessel and is constructed to pressure vessel standards. At the end of the work cycle the air is simply returned to the atmosphere.
Hydraulic reservoirs
Hydraulic systems, on the other hand, need a finite amount of liquid fluid that must be stored and reused continually as the circuit works. Therefore, part of any hydraulic circuit is a storage reservoir or tank. This tank may be part of the machine framework or a separate stand-alone unit. In either case, reservoir design and implementation is very important. The efficiency of a well-designed hydraulic circuit can be greatly reduced by poor tank design. A hydraulic reservoir does much more than just provide a place to put fluid. A well-designed reservoir also dissipates heat, allows time for contamination to drop out of the fluid, and allows air bubbles to come to the surface and dissipate. It may give a positive pressure to the pump inlet and makes a convenient mounting place for the pump and its motor, and valves.
Some standard reservoir layouts
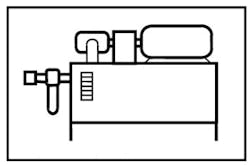
The main disadvantage to this configuration is that the pump must create enough vacuum to raise and accelerate the fluid into the pump inlet. For most pumps, this is not a big problem, but it is not the best situation for any of them. Axial or in-line piston pump life can be adversely affected by medium to high vacuum at its inlet when using this layout. The piping in this configuration must be sealed, should be as short as possible, and have few or no bends.
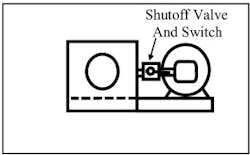
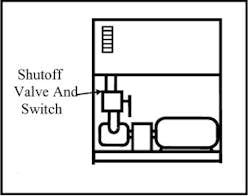
Pump alongside tank. Figure 6-3 shows another design that is satisfactory for any type pump. (Many suppliers prefer this layout.) This arrangement is sometime called a flooded suction, because the pump inlet always is filled with fluid.
Although the pump inlet always has fluid, there will be some vacuum in the inlet line when the pump is running. A pump with its inlet below fluid level no longer has to raise the fluid, but it does have to accelerate and move it. However, this design is far better than the pump on top and can extend the service life of any type pump.
Notice the shutoff valve in the inlet line. This valve allows maintenance work to be done on the pump without draining the tank. Some precautions: install a free-flowing valve (such as a quarter-turn ball type) and use a valve with a limit switch to indicate full open. Wire this limit switch in parallel with the pump motor starter, so the pump cannot start until the shutoff valve is open.
Pump under tank. Figure 6-4 shows the very best pump/tank layout. This design puts the pump below the reservoir to take advantage of static head pressure. As explained in Chapter 1, there is pressure at the bottom of any column of fluid (about .4 psi per foot of elevation). With the tank above, the pump not only has fluid at its inlet all the time, but this fluid also could be at 2- to 4-psi positive pressure.Tank functions
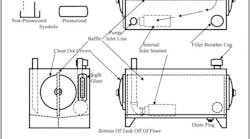
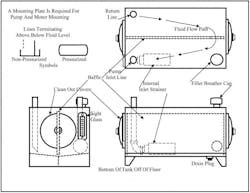
The main reason the reservoir exists is to store fluid. The accepted rule for sizing a tank is: the tank volume should be two to four times the pump flow in gpm. This is only a general rule. Some circuits may require more volume, while less fluid may be adequate for other circuits. A 25-gpm pump would work well with a 50- to 75-gallon reservoir for most circuits. With this general rule, the returned fluid theoretically will have two to three minutes in the tank before it circulates again. As Figure 6-5 shows, a baffle separates the return line from the pump inlet line, forcing the fluid to take the longest possible path through the reservoir before returning to the pump inlet. This arrangement also mixes the fluid well and provides more time to drop contaminates and de-aerate. In addition, the fluid spends more time in contact with the outer walls of the reservoir to dissipate heat.
When a circuit has single-acting cylinders or cylinders with large rods, the volume of fluid returned on the extend stroke is greatly reduced – or even non-existent. In these cases, the tank must be larger than the general rule states to keep fluid level from falling below the pump inlet line.
Another situation where a tank may need to be larger is if the circuit has accumulators. Accumulators need fluid to fill them at start up and space into which to discharge this fluid at shut down. An undersized reservoir may not have enough fluid to keep the pump inlet covered at all times.
Another case for making the tank larger than the general rule is to add cooling capacity. All of the tank’s exterior walls can radiate heat to the atmosphere, so the larger the tank the greater the heat dissipation. Use the formula in Figure 6-6 to figure tank-cooling capacity. An example problem is shown later in this chapter. Several data books include formulas and charts showing tank-cooling capacity. These also can be used in conjunction with this manual.
Heat dissipation is the main reason for having the tank bottom off the floor and why it is important not to stop free air flow around the tank. It is not good practice to enclose a power unit to reduce noise.
Tank components
The filler-breather cap should include a filter media to block contaminants as the fluid level lowers and rises during a cycle. If the cap is used for filling, it should have a filter screen in its neck to keep large particles out. It is best to pre-filter any fluid entering the tank . . . either by a filter cart transfer unit or by a filter fill unit (as shown in Chapter 2, Figure 2-2.)
Remove the drain plug to empty the tank when the fluid needs be changed. At the same time, the clean-out covers should be removed to provide access to clean out all residue, rust, and flaking paint that may have accumulated in the tank (and doesn’t flow out with the fluid). If this is not done, the new fluid gets dirty immediately — defeating the purpose of the fluid change. In the design in Figure 6-5, the clean-out covers and internal baffle are assembled together, with some brackets to keep the baffle upright. Rubber gaskets seal the clean-out covers to prevent leaks.
If the system is badly contaminated, it is wise to flush all pipes and actuators while changing the tank fluid. This can be done satisfactorily by disconnecting the return line and placing its end in a drum, then cycling the machine. Do not over-fill the drum during this operation or it may rupture and spill fluid.
Sight glasses make it easy to visually check fluid level. Calibrated sight gauges provide even more accuracy. If the sight glass or gauge is difficult to see or is damaged, find another way to check the fluid level.
Many sight gauges include a fluid-temperature gauge. Tanks that feel hot to the touch may actually be within operating range. The temperature gauge gives a more specific indication. On older systems where the temperature gauge may have stopped working, it’s best to check fluid temperature with some other method.
Pump connections
The inlet line to the pump should be at the same end of the reservoir as the return line, with the baffle between them forcing returning fluid to travel to the opposite end of the tank and back. The inlet must be below the fluid level and may include a strainer. If the inlet line is just a straight piece of pipe installed vertically, it is best to cut the line’s open end at 45° so it is impossible to butt it against the floor of the tank, which could block flow. Outside the tank, this line should lead as directly to the pump as possible, with no unnecessary bends or connections. Never use a pipe union in the inlet line; unions are almost impossible to seal against air leaks. Even a minute leak in the inlet line can cause pump cavitation and all of its problems.
The return line should be located in the same end of the tank as the inlet line and on the opposite side of the baffle (as shown in Figure 6-5). The return line must terminate below fluid level to reduce turbulence and aeration. The open end of the return line also should be cut at 45° to eliminate the chance of stopping flow if it gets pushed to the bottom. Another good practice is to point the opening toward the side wall to get the most heat-transfer surface contact possible.
When a hydraulic reservoir is part of the machine base or body, it may not be possible to incorporate some of the features discussed in this chapter. However, keep in mind the different functions mentioned to try to eliminate ongoing problems.
Non-pressurized and pressurized reservoirs
Reservoirs are seldom pressurized because that feature is not required under most circumstances. One reason for using a pressurized reservoir is to provide the positive inlet pressure required by some pumps -- usually in line piston types. Another reason is to force fluid into a cylinder through an undersized prefill valve. Both of these reasons may require pressures between 5 and 25 psi and could not use a conventional rectangular reservoir design.
Another reason for pressurizing a tank is to keep out contaminates. If the reservoir always has a positive pressure in it there is no way for atmospheric air with its contaminants to enter. Pressure for this application is very low – 0.1 to 1.0 psi -- and may be all right even in a rectangular design tank.
A pressurized reservoir would be built like any pressure vessel, but with the baffling and other features shown in Figure 6-5. Note however that the reservoir pictured in Figure 6-5 is non-pressurized. The symbol for this type tank is shown at the left. The symbol also indicates how lines that terminate above and below fluid level are shown. If a drain line comes from an area that might have suction part of the time, it might not be best to terminate it below fluid level. If this type line terminated below fluid level, it could suck oil into the unit and possibly cause sluggish action. The drain line from the case drain of a pressure-compensated piston pump and an air bleed valve should terminate below fluid level at all times. This keeps air from being sucked in and causing problems.
Heat in hydraulic systems
All heat in a hydraulic circuit comes from wasted energy. Any horsepower put into the circuit that does not do useful work wastes energy.
Any circuit has inefficiencies that can be up to 15% of input power. This is bypass fluid in pumps, valves or other components and pressure drop through these components and the flow lines. These losses can be reduced, but never completely eliminated in a typical hydraulic circuit. Some ways to reduce inefficiency losses is to correctly size piping and valves, keep working pressure at or only slightly higher than required for all operations, and never allow fluid to relieve to tank. Flow controls also generate heat because they restrict flow. Reducing valves, counterbalance valves, and sequence valves also waste energy... especially if they are not set correctly. A pressure sequence or a counterbalance valve will do its job even when set too high, but will waste more energy at an unnecessarily high setting.
Each lost horsepower generates 2,545 BTU/hour of heat. To put this in perspective, 10 hp would heat a three-bedroom home when the outside air temperature is 30°F. Thus it is obvious what that much heat would do to the temperature of a 20-gallon tank of hydraulic fluid.
In a hydraulic circuit, you must calculate wasted horsepower to determine heat generation. In a highly efficient circuit this figure could be low enough to use the reservoir’s cooling capacity to keep maximum operating temperature below 130°F. If heat generation is slightly higher than a standard tank will handle, it may be best to oversize the tank rather than adding a heat exchanger. An oversize tank is less expensive than a heat exchanger; and avoids the cost of installing water lines.
It is easy to figure heat generation by figuring horsepower input and subtracting horsepower output. With the gauge at a fixed-volume pump’s outlet reading 150 psi and a gauge at the working cylinder reading 125 psi, there is a 25-psi pressure difference between energy in and work out. To figure horsepower loss, multiply (0.000583)(gpm)(psi). For this example, assume a 40-gpm pump. Then, lost horsepower = (0.000583)(40)(25) = .58. To determine actual heat loss, this figure must be divided by the percentage of the cycle that it occurs. If this figure is from the cylinder extending and the extend time was four seconds during a total cycle of 12 seconds, then figure 1/3 of the .58 hp or .19 hp as waste. Do this operation for each actuator in both directions of travel to determine total wasted horsepower. After all actuator losses are calculated, add them together to determine total wasted horsepower. (Note that when this horsepower total is less than the answer from the formula in Figure 6-6, no heat exchanger is required.)
The example just cited would be a straightforward circuit without any flow controls or other added restrictions. With a flow control in the circuit, pressure drop would be much higher and energy waste would increase drastically. Most circuits using a pressure-compensated pump would have flow controls so the pump would be at compensator setting while the actuator would be at whatever pressure is required. A circuit without flow controls or other restrictive plumbing usually has low energy losses. This type system may get by without a heat exchanger when ambient temperature stays below 110°F.
Tank cooling capacity
Use the formula in Figure 6-6 to estimate how much heat a given tank can dissipate. This formula assumes the tank is open on all sides with free air movement around it. (Remember, pipes, cylinders, and valves also have surface areas that can dissipate heat but those areas are usually not included when calculating cooling capacity.) For a 100-gal tank and a 30°F. temperature difference, this amounts to about 1.4 hp. A single cylinder circuit wasting only 0.7 hp would not require a heat exchanger on a 100°F. day while maintaining a maximum fluid temperature of 130°F.
Heating and cooling devices
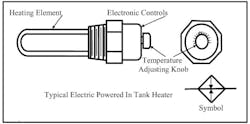
Tank heaters: Most industrial hydraulic units operate in a warm indoor atmosphere so low temperature is not a problem. For circuits that see temperatures below 65° to 70°F., some sort of fluid heater is recommended. The most common tank heater is an electric-powered immersion type. These units consist of resistive wire in a steel housing with a mounting option. They often have an integral thermostatic control. The heating element on most units contacts the fluid directly, similar to a hot water heating system. Some immersion heaters in a sealed housing heat the air in the enclosure. The air then transfers heat to the fluid. This heater-in-tube arrangement allows the heating unit to be changed without draining the reservoir.
Electric heating units should not have concentrated heat like those used to heat water. Oil viscosity at low temperature is thick enough to retard movement. This could allow fluid next to the heating rods to overheat and possibly breakdown. The usual recommendation is for the heating rods not to have over 8 to 10 watts per square inch density. This limit may require multiple heating rods to meet the heat requirement of some systems.
Another way to electrically heat a tank is with a mat that has heating elements similar to those in an electric blanket. This mat is attached to the outside of the bottom of the reservoir and adds heat during low temperature conditions. This type heater requires no ports in the tank for insertion. It also evenly heats the fluid even during times of low or no fluid circulation.
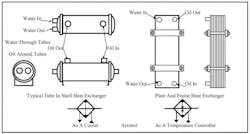
Heat can be introduced through a heat exchanger by using hot water or steam in place of the cooling water. The exchanger becomes a temperature controller when it also uses cooling water to take away heat at other times. Figure 6-10 depicts the symbol for this type heat exchanger. (Chapter 7 shows an alternate way to add heat while filtering system fluid.) Temperature controllers are not a common option in most climates because the majority of industrial applications operate in controlled environments.
The formula for estimating how many kilowatts are needed to heat a certain size tank from an expected minimum ambient to a nominal working temperature of 50° to 70°F. is shown in Figure 6-8. Use it to size a heater when the tank is exposed to low temperatures.
Heat exchangers
Cooling hydraulic systems is necessary more often than heating them due to wasted energy from inefficiency and/or poor circuit design. A well-designed circuit eliminates most heat generation and may not need a heat exchanger. Use the same method to estimate how much heat a system generates as was used for the previous tank-cooling example.
When figuring wasted horsepower, see if there is any way to reduce or eliminate it so it does not have to be paid for twice. It costs money to produce the unused heat and it is expensive to get rid of it after it enters the system. Heat exchangers are expensive, the water that through them is not free, and maintenance of this cooling system can run high.
Items such as flow controls, sequence valves, reducing valves, and undersized directional control valves can add heat to any circuit. Are these items absolutely necessary? Can they be replaced with another valve or part that does the same thing with less pressure drop? Anytime these questions can be answered with a yes, the circuit is not ready to build.
Air-cooled heat exchangers
After calculating wasted horsepower, review heat exchanger manufacturers’ catalog to pick out a unit that will dissipate that amount of energy. Most catalogs include charts for given size heat exchangers that show the amount of horsepower and/or BTU they can remove at different flows, oil temperatures, and ambient air temperatures.
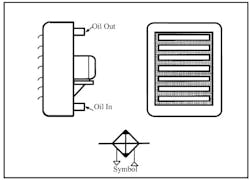
On circuits with pressure-compensated pumps, a small air-cooled heat exchanger often is used to cool case drain flow. On this type system, most of the heat generation is from internal leakage and control oil that flows to tank through the pump case drain. One type heat exchanger -- called a coupling cooler -- is a finned tube formed into a circle and wrapped around a blower that is driven by the motor turning the pump. A similar arrangement uses a small flat radiator attached to the intake end of the fan-cooled electric motor that drives the pump. Both units are low-flow, low-backpressure devices and dissipate only a small amount of heat.
Some systems use a water-cooled heat exchanger in the summer and an air-cooled one in the winter. This arrangement eliminates plant heating in summer weather and saves heating expense in the winter.
Water-cooled heat exchangers
Two popular water-cooled heat exchanger designs. As before, manufacturers’ catalogs will assist you in picking out a unit to dissipate the amount of wasted heat energy. For water-cooled heat exchangers, catalogs ask for information such as how much and what temperature water is available, how many horsepower or BTU of energy must be dissipated, what is the fluid flow in gpm, and how many passes will the water makes to get through the body. The more passes -- up to four maximum usually -- the greater the heat dissipation per gallon of water flow. Charts that use this information make it easy to pick the correct size heat exchanger.
Figure 6-10 shows two types of water-cooled heat exchangers commonly used for hydraulic systems. The shell-and-tube design is the most common one at present, but the plate-and-frame or brazed-plate type are coming along because they are much smaller and easier to maintain. It is important to use clean water in either type unit to keep from building up insulating deposits or corroding the tubes until they leak water into the oil. Treated water from a cooling tower works best.
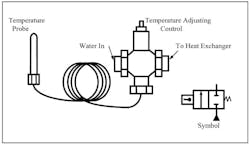
Either type heat exchanger should have a thermostatic control to turn on the water or fan only when the fluid temperature rises above its normal operating range. Without a thermostatic control, fluid could be too cold and thick, while wasting the energy to operate the heat exchanger. Figure 6-11 shows one type of water-control valve that requires no electrical hookup. Heat-sensitive liquid in a thermometer-type probe in the tank expands and opens a water valve upon reaching a preset temperature. The temperature is fully adjustable to meet any requirement and it operates in all types of fluid. Another option is an electrically operated temperature sensor that controls a solenoid-operated water valve. This installation requires an electrical hookup but is able to maintain a fluid-temperature range at any desired setting.
